放浪軍師のXamarin.Formsによるアプリ開発。
今回はStyleとTriggerとBindablePropertyを学びます。
まず、初めて訪問された方は以下をお読みください。
www.gunshi.info
Xamarin.Formsでリスト項目の選択
前々回の記事コントロール配列の呪いを解きたい - 放浪軍師のXamarin.Formsアプリ開発局を受けて、spacekey(@dlspacekey)さん | Twitterさんが以下のような記事を書いてくださいました!
Xamarin.Formsでリスト項目の選択 | Spacekey
いやほんと、ありがとうございます!しかもかなり丁寧に書いていらっしゃる様子…。隅から隅まで余すことなくお勉強させていただこうと思います。
今回は解らない技術が複数あった為、ひとつずつ検証してから実装してみました。
Style
記事によればまずStyleという知らない技術が使われていたので早速ググってみると田淵 義人@エクセルソフト(@ytabuchi)さん | Twitterさんの記事がヒットしました。
ytabuchi.hatenablog.com
いつも有難うございます!
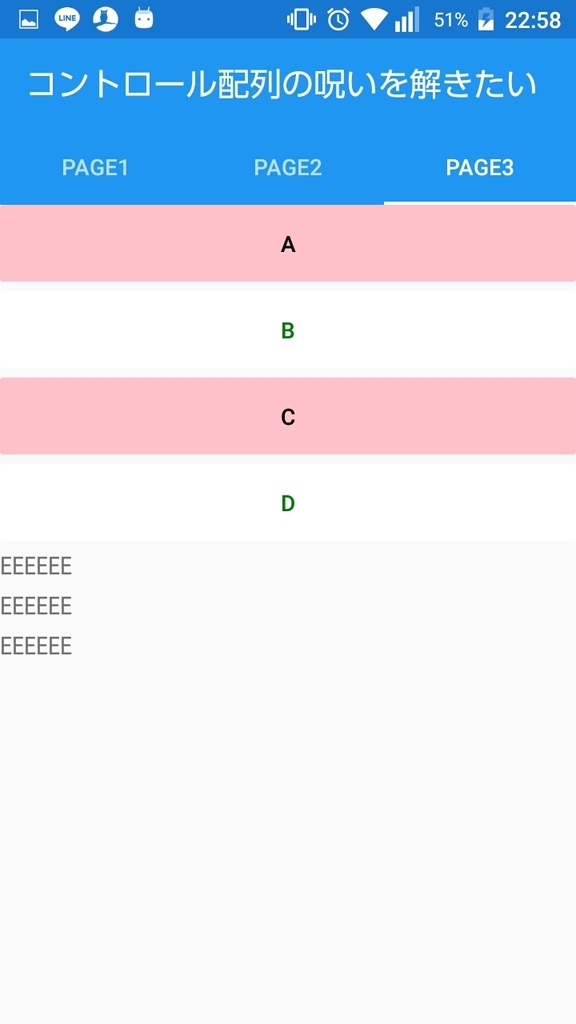
どうやらStyleとはViewに配置したコントロールの色等のデフォルト形式を決める事が出来る機能であるようです。Viewだけでいけるというのが憎いじゃないですか。
    <ContentPage.Resources>
        <ResourceDictionary>
            <Style x:Key="Style1" TargetType="Button">
                <Setter Property="TextColor" Value="Black"/>
                <Setter Property="BackgroundColor" Value="Pink"/>
            </Style>
            <Style x:Key="Style2" TargetType="Button">
                <Setter Property="TextColor" Value="Green"/>
                <Setter Property="BackgroundColor" Value="White"/>
            </Style>
            <Style TargetType="Label">
                <Setter Property="Text" Value="EEEEEE"/>
            </Style>
        </ResourceDictionary>
    </ContentPage.Resources>

    <StackLayout>
        <Button Text="A" Style="{StaticResource Style1}"/>
        <Button Text="B" Style="{StaticResource Style2}"/>
        <Button Text="C" Style="{StaticResource Style1}"/>
        <Button Text="D" Style="{StaticResource Style2}"/>
        <Label />
        <Label />
        <Label />
    </StackLayout>
こうすれば、それぞれのコントロールはStyleで指定したテンプレートどおりになります。また、上記Labelのようにx:Keyを指定しない場合は全体に適用される。…こいつぁ便利だ!

Trigger
Triggerというのも見たことが無い奴です。こいつも調べてみましたところ、以下のような記事が見つかりました。SIN.Hirauchi/クラスメソッド (@furuya02) | Twitterさんの記事です。
www.buildinsider.net
今回使われているのは、4. ページ全体のトリガーに該当する部分ですね。他にあるようにコントロールやイベントにも指定可能みたいですね。早速使ってみます。
    <ContentPage.Resources>
        <ResourceDictionary>
            <Style x:Key="Style1" TargetType="Button">
                <Setter Property="TextColor" Value="Black"/>
                <Setter Property="BackgroundColor" Value="Pink"/>
                <Style.Triggers>
                    <Trigger TargetType="Button" Property="Text" Value="Z">
                        <Setter Property="TextColor" Value="Red"/>
                        <Setter Property="BackgroundColor" Value="Yellow"/>
                    </Trigger>
                </Style.Triggers>
            </Style>
            <Style x:Key="Style2" TargetType="Button">
                <Setter Property="TextColor" Value="Green"/>
                <Setter Property="BackgroundColor" Value="White"/>
                <Style.Triggers>
                    <Trigger TargetType="Button" Property="Text" Value="Z">
                        <Setter Property="TextColor" Value="Yellow"/>
                        <Setter Property="BackgroundColor" Value="Red"/>
                    </Trigger>
                </Style.Triggers>
            </Style>
        </ResourceDictionary>
    </ContentPage.Resources>

    <StackLayout>
        <Button Text="A" Style="{StaticResource Style1}"/>
        <Button Text="B" Style="{StaticResource Style2}"/>
        <Button Text="C" Style="{StaticResource Style1}"/>
        <Button Text="D" Style="{StaticResource Style2}"/>
        <Button Text="{Binding ButtonText1.Value}" Command="{Binding Command1}" Style="{StaticResource Style1}"/>
        <Button Text="{Binding ButtonText2.Value}" Command="{Binding Command2}" Style="{StaticResource Style2}"/>
    </StackLayout>
    public ReactiveProperty<string> ButtonText1 { get; private set; } = new ReactiveProperty<string>("A");
    public ReactiveProperty<string> ButtonText2 { get; private set; } = new ReactiveProperty<string>("B");
    public ReactiveCommand Command1 { get; } = new ReactiveCommand();
    public ReactiveCommand Command2 { get; } = new ReactiveCommand();
    public PrismContentPage3ViewModel()
    {
        Command1.Subscribe(_ => ButtonText1.Value = "Z");
        Command2.Subscribe(_ => ButtonText2.Value = "Z");
    }
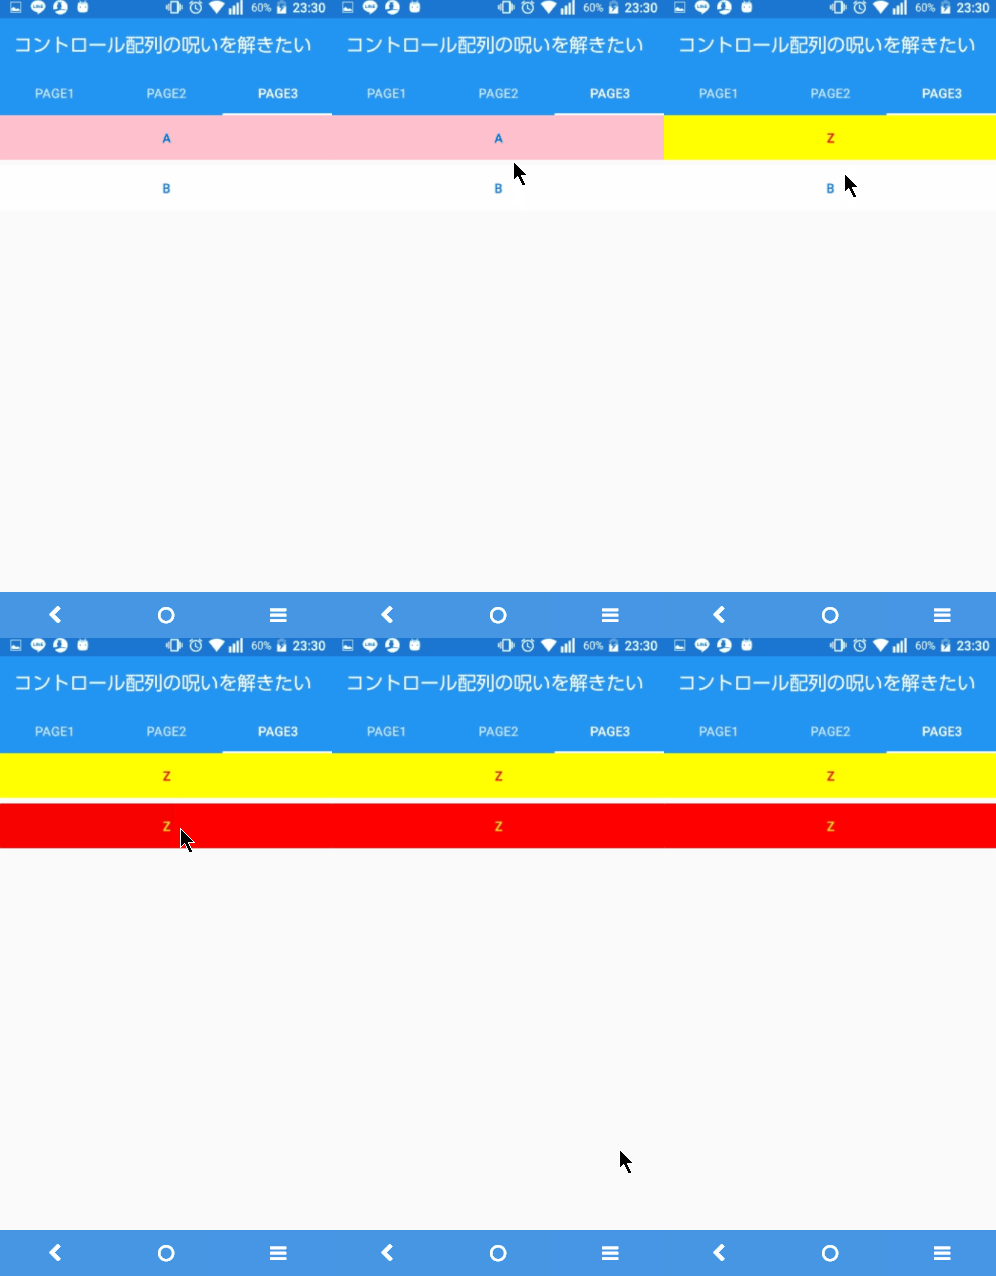
空白のボタンを押すとButtonのTextが"Z"に変わるようにしています。そうするとTriggerの条件を満たすのでStyleが変わります。こいつも便利だぁ!

BindableProperty
最後にBindablePropertyです。これに関してはspacekey(@dlspacekey)さん | Twitterさんが書いているToggleButtonクラスの記事そのものですね。コントロールを継承し、プロパティを追加したクラスを作成できるって事みたいです。今回の場合はButtonを継承したToggleButtonを作成していますね。
<?xml version="1.0" encoding="utf-8" ?>
<ContentPage xmlns="http://xamarin.com/schemas/2014/forms"
             xmlns:x="http://schemas.microsoft.com/winfx/2009/xaml"
             xmlns:prism="clr-namespace:Prism.Mvvm;assembly=Prism.Forms"
             xmlns:viewmodels="clr-namespace:AntiControlArray.ViewModels"
             prism:ViewModelLocator.AutowireViewModel="True"
             x:Class="AntiControlArray.Views.PrismContentPage3"
             x:Name="Base"
             Title="Page3">

    <ContentPage.Resources>
        <ResourceDictionary>
            <Style TargetType="viewmodels:ToggleButton">
                <Setter Property="TextColor" Value="Black"/>
                <Setter Property="BackgroundColor" Value="Pink"/>
                <Style.Triggers>
                    <Trigger TargetType="viewmodels:ToggleButton" Property="IsSelected" Value="True">
                        <Setter Property="TextColor" Value="Red"/>
                        <Setter Property="BackgroundColor" Value="Yellow"/>
                    </Trigger>
                </Style.Triggers>
            </Style>
        </ResourceDictionary>
    </ContentPage.Resources>

    <StackLayout>
        <viewmodels:ToggleButton Text="ぼたん"
                                 Command="{Binding BindingContext.Command1, Source={x:Reference Base}}"
                                 IsSelected="{Binding IsSelected1.Value}"/>
        <viewmodels:ToggleButton Text="ぼたん"
                                 Command="{Binding BindingContext.Command2, Source={x:Reference Base}}"
                                 IsSelected="{Binding IsSelected2.Value}"/>
    </StackLayout>

</ContentPage>
x:Name="Base"とかCommand="{Binding BindingContext.Command1, Source={x:Reference Base}}"とかの意味が調べてみても良くわからなかったんですが強行…。
Trigger TargetType="viewmodels:ToggleButton" Property="IsSelected" Value="True"として、IsSelectedによってStyleが変わるようにしています。
        public ReactiveProperty<bool> IsSelected1 { get; private set; } = new ReactiveProperty<bool>();
        public ReactiveProperty<bool> IsSelected2 { get; private set; } = new ReactiveProperty<bool>();
        public ReactiveCommand Command1 { get; } = new ReactiveCommand();
        public ReactiveCommand Command2 { get; } = new ReactiveCommand();
        public PrismContentPage3ViewModel()
        {
            Command1.Subscribe(_ => { IsSelected1.Value = !IsSelected1.Value; });
            Command2.Subscribe(_ => { IsSelected2.Value = !IsSelected2.Value; });
        }
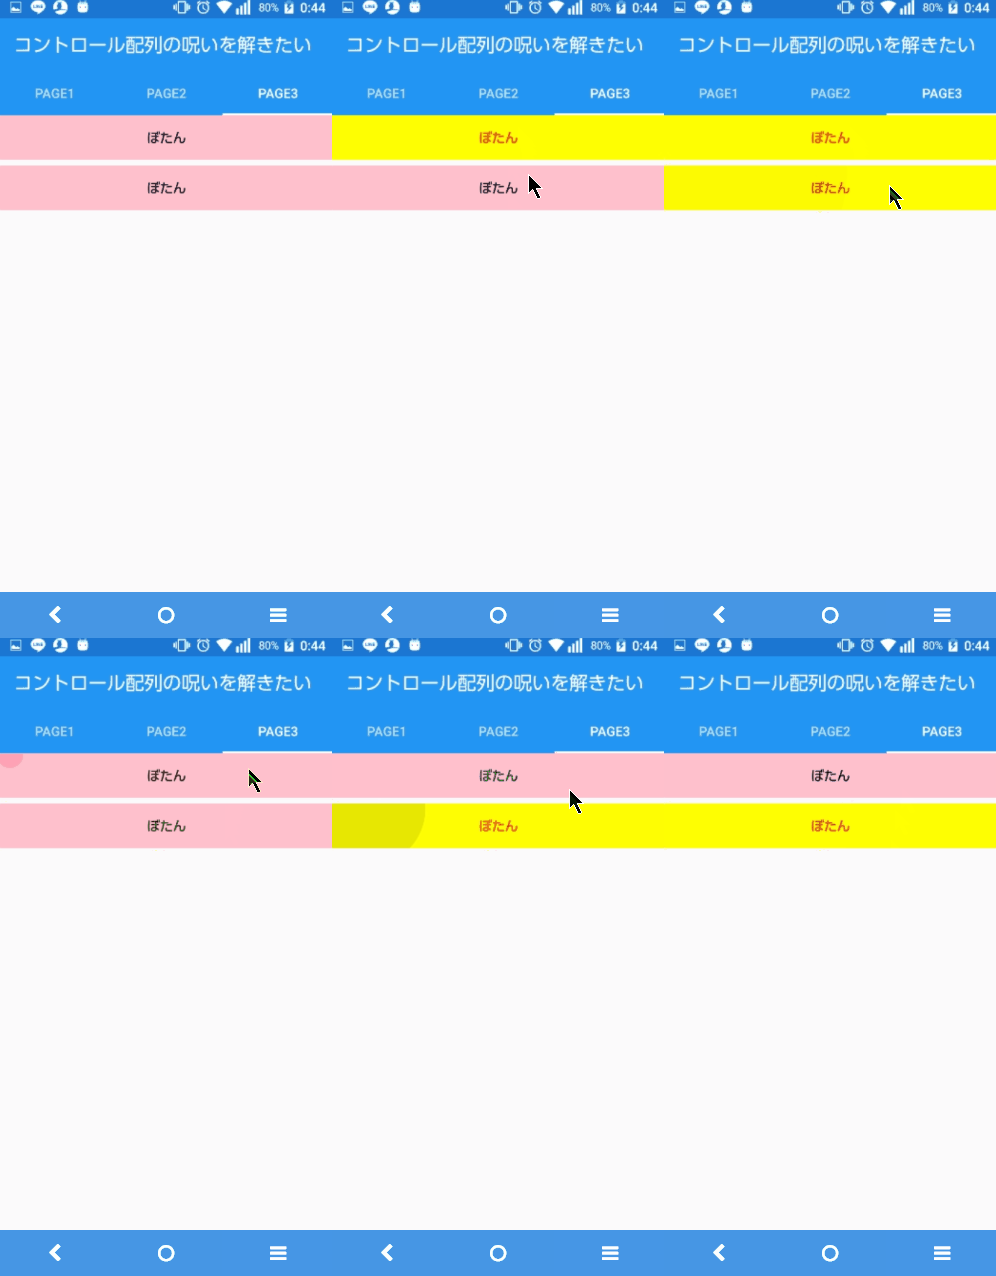
Buttonを押すたびにIsSelectedが切り替わるのでStyleにより押す度に色が変化します。
尚、以下ToggleButtonクラスは記事と同じくViewModesに置きましたがこれは手抜きだと書いてあるので、正しくは別の場所に置くべきなんだと思います。ただ、それが何処なのかが結局わかりませんでした…。他のページでも流用できるはずなのでViewModelやViewに置くのは誤りでModelsに配置???それも妙ですよね…別のフォルダを作って放り込むのが正解かも???色々調べてみたんですが結論は得られず…無念。
public class ToggleButton : Button
{
    public static readonly BindableProperty IsSelectedProperty =
        BindableProperty.Create(
            "IsSelected",
            typeof(bool),
            typeof(ToggleButton),
            false);

    public object IsSelected
    {
        get => GetValue(IsSelectedProperty);
        set => SetValue(IsSelectedProperty, value);
    }
}
挙動はこんな感じです。

…で、これらをListViewでまとめ上げたのが
Xamarin.Formsでリスト項目の選択 | Spacekey
という事になりますね。こちらはそのまんまなので割愛します。
まとめ
とんでもなく苦戦しました!最初はこれら解らない点をまとめて理解しようとした為、頭の中がごっちゃごちゃしてどうしようもなくなりましたね。結局まとめて理解しようとするのはやめて、一つ一つ分からない事を分離して以上のような感じでまとめてみましたが如何でしょうか?大変ではありましたが随分と身に付いた気がします。
記事を書いてくださいましたspacekey(@dlspacekey)さん | Twitterさん本当にありがとうございました。俺はまた一つ成長したぞー!!!