放浪軍師の Xamarin.Forms によるアプリ開発。
今回は乱ちゃんの見た目を改造したいと思います。
Xamarin.Formsのアプリでスマホとデスクトップの見た目を変えたい
乱ちゃんProjectはスマホ、デスクトップの両方で使えるアプリケーションですが、機能は同じでも見た目は変えた方が良さそうです。理由は、
となります。この場合、機能自体は全く同じなので Model は当然共通で Viwe は分離するのですが、問題は ViewModel をどうするかになりますよね。通常 MVVM では View と ViewModel を1:1で設計するんじゃないかと思います。まぁ色んなページでMVVMの解説があると思いますが大体そうなってるはずです。Prismを使った場合もそれが前提になっていて、Viewを作ると同名のViewModelも自動的に作成され紐付けされますね。
ただ、今回の場合は画面の配置のみが違うだけなので ViewModel を共通化できるんじゃないかと考えやってみました。
開発環境
Xamarin.Forms 3.4.0.1009999
Xamarin.Forms.Platform.WPF 3.4.0.1009999
ReactiveProperty 5.2
画面遷移
各プラットフォーム別で分岐させるには、以下のように記述します。
if (Device.RuntimePlatform == Device.Android) await navigation.PushAsync(new Views.RanShikaMainPage());
if (Device.RuntimePlatform == Device.iOS) await navigation.PushAsync(new Views.RanShikaMainPage());
if (Device.RuntimePlatform == Device.UWP) await navigation.PushAsync(new Views.RanShikaWindowsPage());
if (Device.RuntimePlatform == Device.WPF) await navigation.PushAsync(new Views.RanShikaWindowsPage());
Android と iOS は Views.RanShikaMainPage へ遷移し、UWP と WPF は Views.RanShikaWindowsPage へ遷移するようにしています。
Views.RanShikaMainPage
スマホ版の場合に遷移するページです。TabbedPageにして画面を分離しています。
<TabbedPage xmlns="http://xamarin.com/schemas/2014/forms"
            xmlns:x="http://schemas.microsoft.com/winfx/2009/xaml"
            xmlns:Views="clr-namespace:RanCyan.Views"
            xmlns:controls="clr-namespace:RanCyan.Controls"
            x:Class="RanCyan.Views.RanShikaMainPage"
            x:Name="Base"
            Title="乱屍">

    <略>

    <ContentPage Title="進言">
        <Grid>
            <Grid.RowDefinitions>
                <RowDefinition Height="4*" />
                <RowDefinition Height="*" />
            </Grid.RowDefinitions>
            <ListView ItemsSource="{Binding ShingenItems}" Grid.Row="0">
                 <略>
            </ListView>
            <Button Text="進言ランダム" Command="{Binding ShingenRanCommand}" Grid.Row="1"/>
        </Grid>
    </ContentPage>

    <ContentPage Title="交神">
        <Grid>
            <Grid.RowDefinitions>
                <RowDefinition Height="4*" />
                <RowDefinition Height="*" />
            </Grid.RowDefinitions>
            <ListView ItemsSource="{Binding KoushinItems}" Grid.Row="0">
                 <略>
            </ListView>
            <Button Text="交神ランダム" Command="{Binding KoushinRanCommand}" Grid.Row="1"/>
        </Grid>
    </ContentPage>

    <ContentPage Title="職業">
        <Grid>
            <Grid.RowDefinitions>
                <RowDefinition Height="4*" />
                <RowDefinition Height="*" />
            </Grid.RowDefinitions>
            <ListView ItemsSource="{Binding SyokugyouItems}" Grid.Row="0">
                 <略>
            </ListView>
            <Button Text="職業ランダム" Command="{Binding SyokugyouRanCommand}" Grid.Row="1"/>
        </Grid>
    </ContentPage>

    <ContentPage Title="討伐">
        <Grid>
            <Grid.RowDefinitions>
                <RowDefinition Height="4*" />
                <RowDefinition Height="*" />
            </Grid.RowDefinitions>
            <ListView ItemsSource="{Binding ToubatsuItems}" Grid.Row="0">
                 <略>
            </ListView>
            <Button Text="討伐先ランダム" Command="{Binding ToubatsuRanCommand}" Grid.Row="1"/>
        </Grid>
    </ContentPage>
</TabbedPage>
Views.RanShikaWindowsPage
デスクトップ版の場合に遷移するページです。こちらはContentPageをGridで区切って一画面に収まるようにしています。
<?xml version="1.0" encoding="utf-8" ?>
<ContentPage xmlns="http://xamarin.com/schemas/2014/forms"
             xmlns:x="http://schemas.microsoft.com/winfx/2009/xaml"
             xmlns:controls="clr-namespace:RanCyan.Controls"
             x:Class="RanCyan.Views.RanShikaWindowsPage"
             x:Name="Base"
            Title="乱屍">

    <略>

    <Grid>
        <Grid.RowDefinitions>
            <RowDefinition Height="4*"/>
            <RowDefinition Height="*"/>
            <RowDefinition Height="8*"/>
            <RowDefinition Height="*"/>
        </Grid.RowDefinitions>
        <Grid.ColumnDefinitions>
            <ColumnDefinition Width="*"/>
            <ColumnDefinition Width="*"/>
        </Grid.ColumnDefinitions>
        <ListView ItemsSource="{Binding ShingenItems}" Grid.Row="0" Grid.Column="0">
             <略>
        </ListView>
        <Button Text="進言" Command="{Binding ShingenRanCommand}" Grid.Row="1" Grid.Column="0"/>
        <ListView ItemsSource="{Binding KoushinItems}" Grid.Row="0" Grid.Column="1">
             <略>
        </ListView>
        <Button Text="交神" Command="{Binding KoushinRanCommand}" Grid.Row="1" Grid.Column="1"/>
        <ListView ItemsSource="{Binding SyokugyouItems}" Grid.Row="2" Grid.Column="0">
             <略>
        </ListView>
        <Button Text="職業" Command="{Binding SyokugyouRanCommand}" Grid.Row="3" Grid.Column="0"/>
        <ListView ItemsSource="{Binding ToubatsuItems}" Grid.Row="2" Grid.Column="1">
             <略>
        </ListView>
        <Button Text="討伐" Command="{Binding ToubatsuRanCommand}" Grid.Row="3" Grid.Column="1"/>
    </Grid>

</ContentPage>
Viewのコードビハインド
ViewModelとの紐付けは双方とも同じ ViewModels.RanShikaMainPageViewModel になります
BindingContext = new ViewModels.RanShikaMainPageViewModel(this.Navigation); //繋げるViewModelクラスを指定する
結果
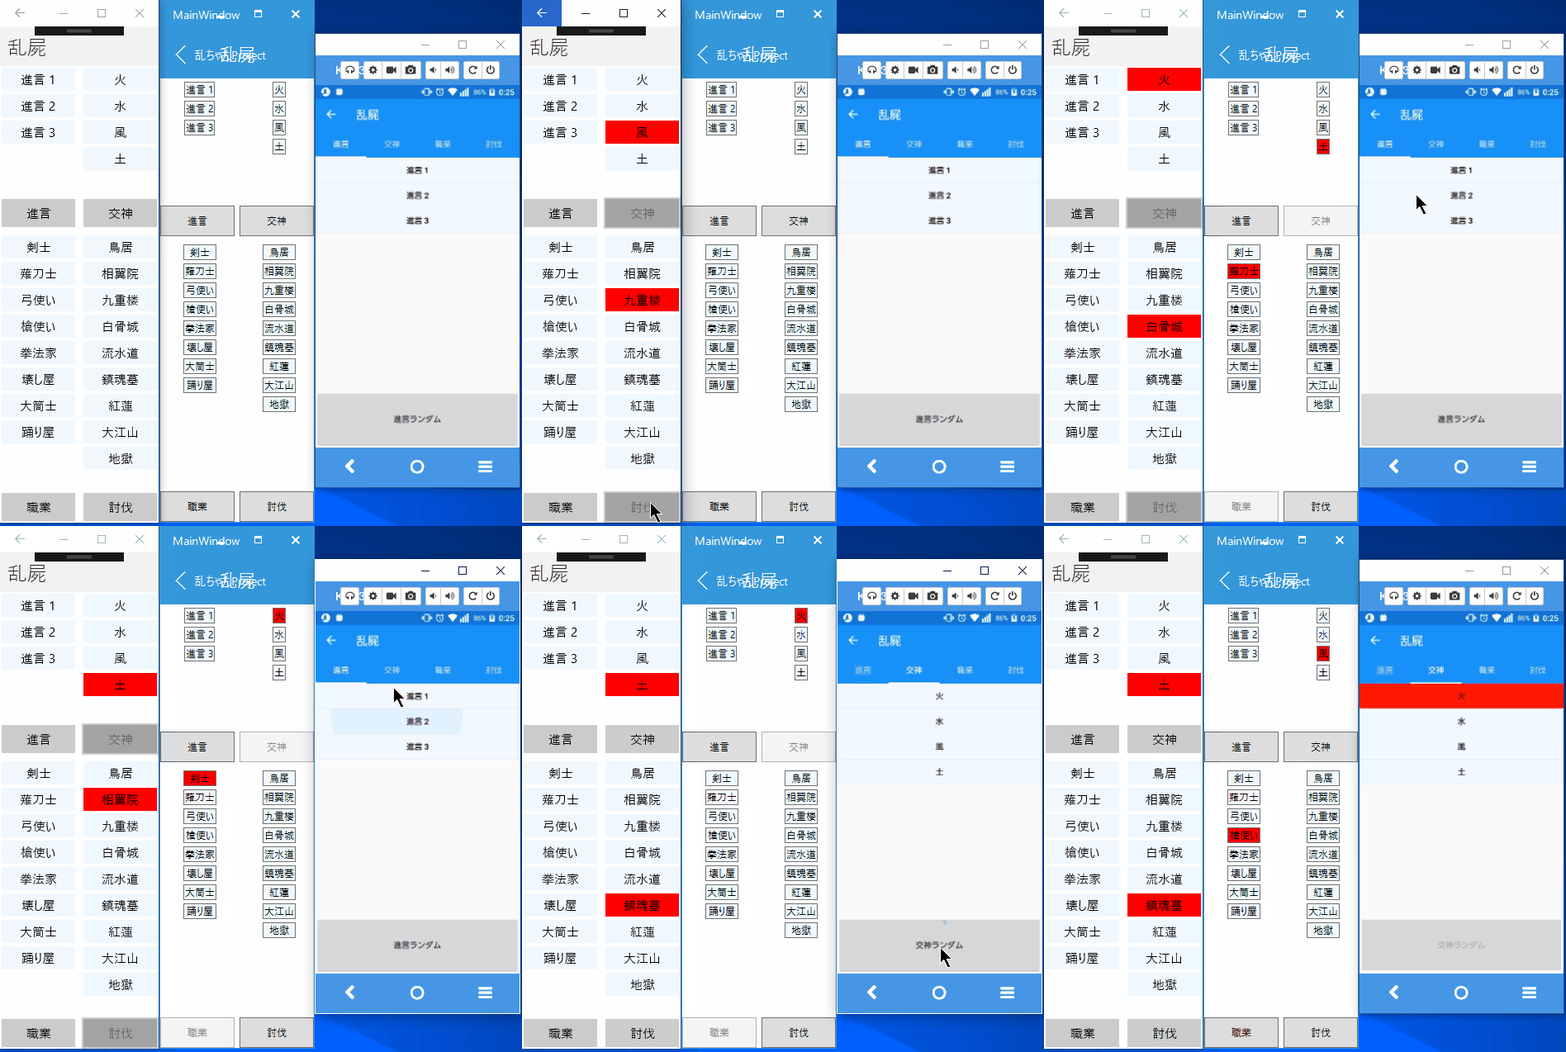
こんな感じになりました。左から UWP / WPF / Android になります。

UWPとWPFは一つの画面に全ての機能が並んでいます。Android(とiOS)はタブで機能を切り替えて使用する形です。
これでデスクトップ版は断然使いやすくなったかと思います。ViewModel も一つで良くなったのでスッキリいい感じ!ついでに WPF のボタンが狭い問題もある程度不自然さが無くなりましたね。
Prismを使う場合のViewModel共通化
上記はPrismを使わない場合ですが、Prismを使う場合以下の方法で ViewModel を共通化出来るようです。Atsushi Nakamuraさんの記事ですね。Xamarin.Forms.BehaviorsPack でいつもお世話になっとります!
www.nuits.jp